Most RV cabinets are not wood. They are a printed vinyl film or a paper-thin veneer over MDF or particle board, finished at the factory with something slick. Follow kitchen-cabinet advice on that and the paint peels, usually in sheets, usually within a year.
Two things change the outcome. Scuff, do not sand, because there is almost nothing there to sand. And choose the primer for the surface, because on these cabinets the primer is doing the entire job of sticking. The colour coat is close to irrelevant by comparison.
What your cabinets are actually made of
Open a door and look at the edge, or at the back of a drawer front. If you can see a seam where the decorative surface wraps a corner, or a repeating grain pattern that appears twice on the same door, it is film rather than timber.
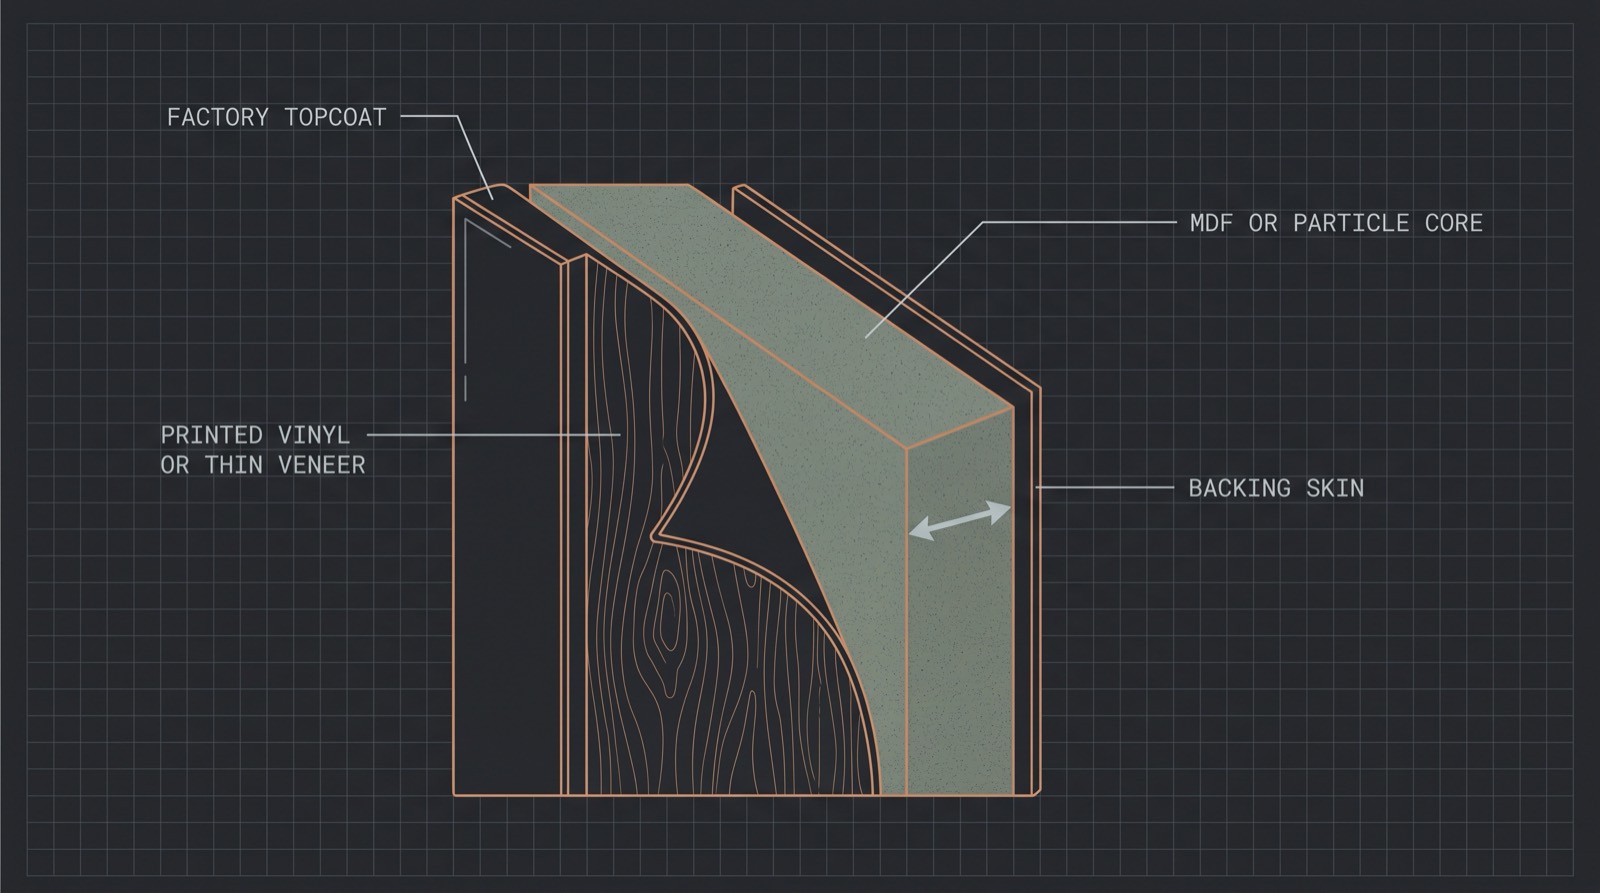
The decorative layer is the thin one in that drawing, and it is the only part with any finish on it. Underneath is soft core that swells if it gets wet and crumbles if you abrade it. That single fact drives everything below.
Some coachbuilt vans and older units do use real timber for face frames and solid edging, often with film on the flat panels. It is common to find both on the same cabinet, which means one door can need two approaches.
Why the usual advice fails here
Kitchen cabinet guides assume solid wood or a thick veneer, so they tell you to sand to bare timber and prime for adhesion and stain blocking. Neither instruction survives contact with an RV.
Sand a paper-thin veneer and you go through it. Sand laminate and you do not abrade it at all, you tear it, because it is plastic. There is no way to “key the surface properly” in the way those guides mean.
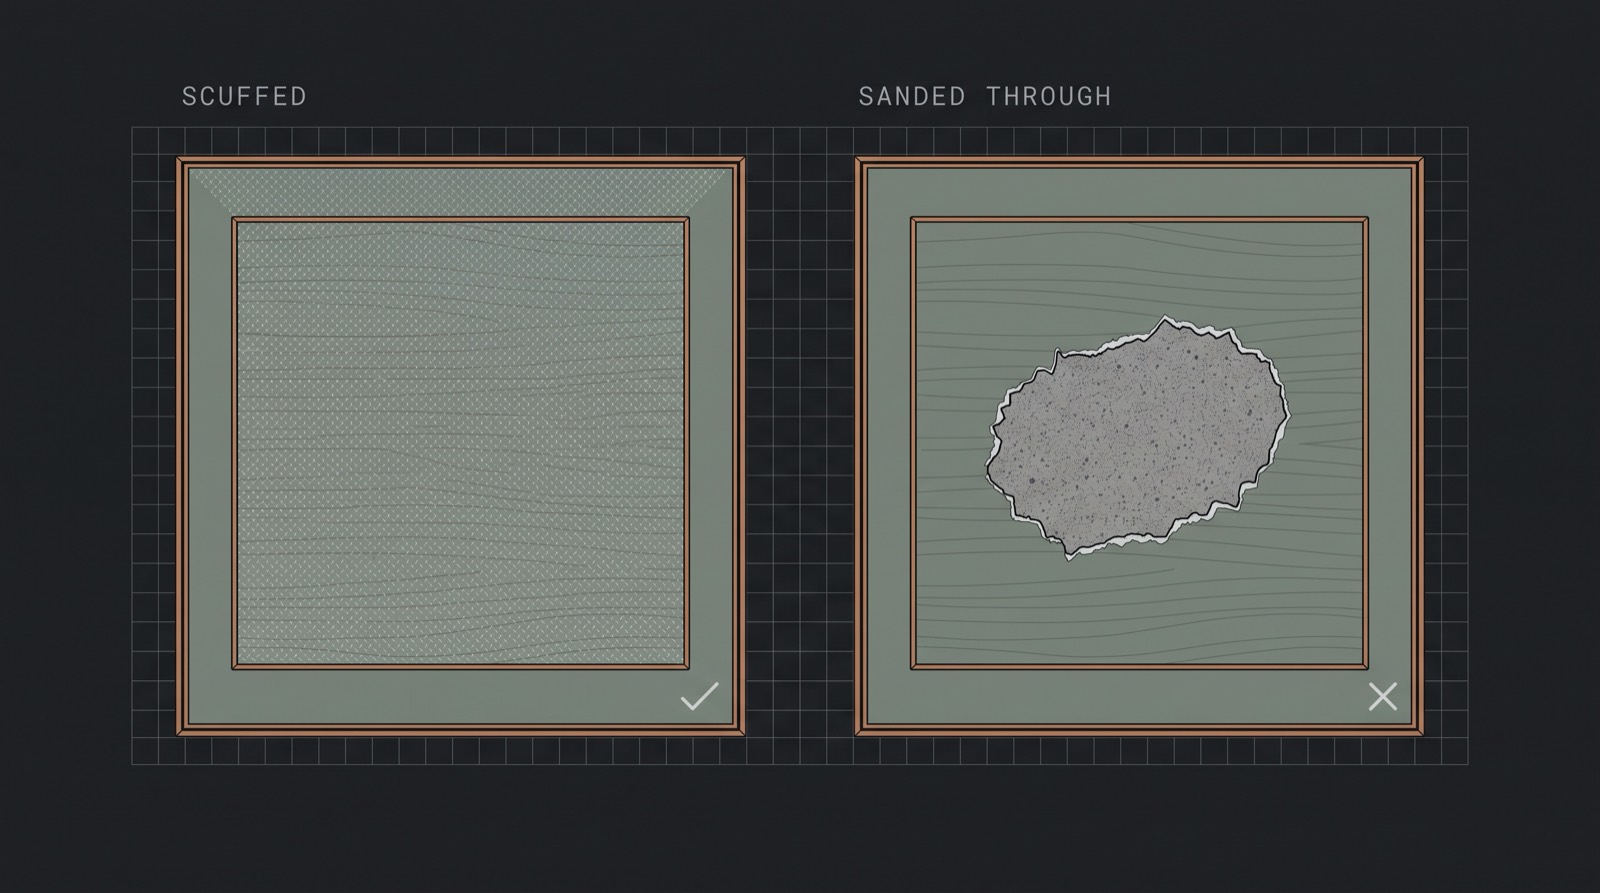
A breach like the one on the right cannot be sanded out. The layer that made it look like wood is gone, and filler over it will read as a patch through any paint you put on top. The only fixes are replacing the door or accepting a visible repair, which is why the sanding step here is deliberately timid.
What you need
| Item | Notes |
|---|---|
| Degreaser | TSP or a cabinet-specific cleaner. Galley cabinets carry cooking grease you cannot see. |
| Abrasive pad or 220 grit | For scuffing only. A pad is safer than paper on film. |
| Bonding primer | The important decision. See the table below. |
| Cabinet enamel | Waterborne alkyd or an enamel sold for cabinetry. Wall paint stays soft. |
| Painter’s tape and film | Interiors are tight; overspray goes everywhere. |
| Labelled bags | One per door, for its hinges and screws. |
| Screwdriver or drill | For hardware removal. |
Small foam rollers and a good brush will do the job. Spraying gives a better finish but is difficult to mask for inside a vehicle, and the cure problem below applies either way.
Which primer for which surface
Primer choice matters more than paint choice in most RV cabinet failures. The two products people argue about solve different problems and are not alternatives.
| Surface | Primer | Why |
|---|---|---|
| Laminate, thermofoil, printed vinyl, glossy factory finish | Waterborne bonding primer such as INSL-X Stix | Grips slick surfaces where ordinary primers slide off |
| Real timber, especially dark stain | Shellac-based such as Zinsser B-I-N | Blocks tannin bleed and seals odour |
| Both on one cabinet, or timber that is also slick | Bond first, then block | They are complementary; some jobs genuinely want both coats |
If you cannot tell which surface you have, test on the inside of a door where nobody looks. Prime a patch, let it cure properly, then try to lift it with tape.
The sequence
- Remove the doors and drawer fronts. Bag and label the hardware per door. RV hinges are often not interchangeable between openings.
- Degrease everything. This is not optional in a galley. Primer will not bond through a film of cooking residue, and the residue is invisible.
- Scuff lightly. You want the sheen gone and the surface dulled, nothing more. If you see a different colour appearing, stop immediately.
- Wipe off the dust. A tack cloth or a damp lint-free rag, then let it dry.
- Prime. Thin and even beats thick. Two thin coats hold better than one heavy one, which sags on vertical faces and stays soft underneath.
- Paint. Two coats of cabinet enamel, respecting the recoat time on the tin rather than your own judgement of dryness.
- Wait. Then rehang. The waiting is the step people skip and it is the one that ruins the job.
The cure window is the part that catches people out
Dry and cured are different things. Waterborne cabinet paint is dry to the touch in about an hour and takes roughly two to three weeks to reach full hardness, with oil-based products at the longer end. The first one to two weeks is when the film is still hardening underneath a dry-feeling surface.
That matters far more in a vehicle than in a house. Two painted surfaces pressed together while still curing will block: they bond to each other and tear when you next open the door. In an RV every cabinet door closes against a frame, and if you drive, it does so repeatedly with the vehicle moving.
Three things follow. Do not stack doors face to face while they dry. Rehang later than feels necessary. And if you can, leave the doors ajar or put felt bumpers on the corners for the first couple of weeks so the painted faces never sit clamped against each other.
What to expect afterwards
A properly bonded finish on RV cabinetry is durable, but it is paint over a soft core, not a factory-cured coating. Edges and handle areas wear first. Keep a small amount of the topcoat for touch-ups, because matching it later is frustrating and the tin is cheap now.
If any of your doors turned out to be genuinely beyond saving, replacing them is its own project with its own numbers. Our plywood cut list calculator will tell you how many sheets a set of replacement fronts takes, and how that count changes depending on which country’s stock you are buying.